Getting started
How to customize and use StyleGuard in Word, web browsers and Google Docs
Launching SG in Word
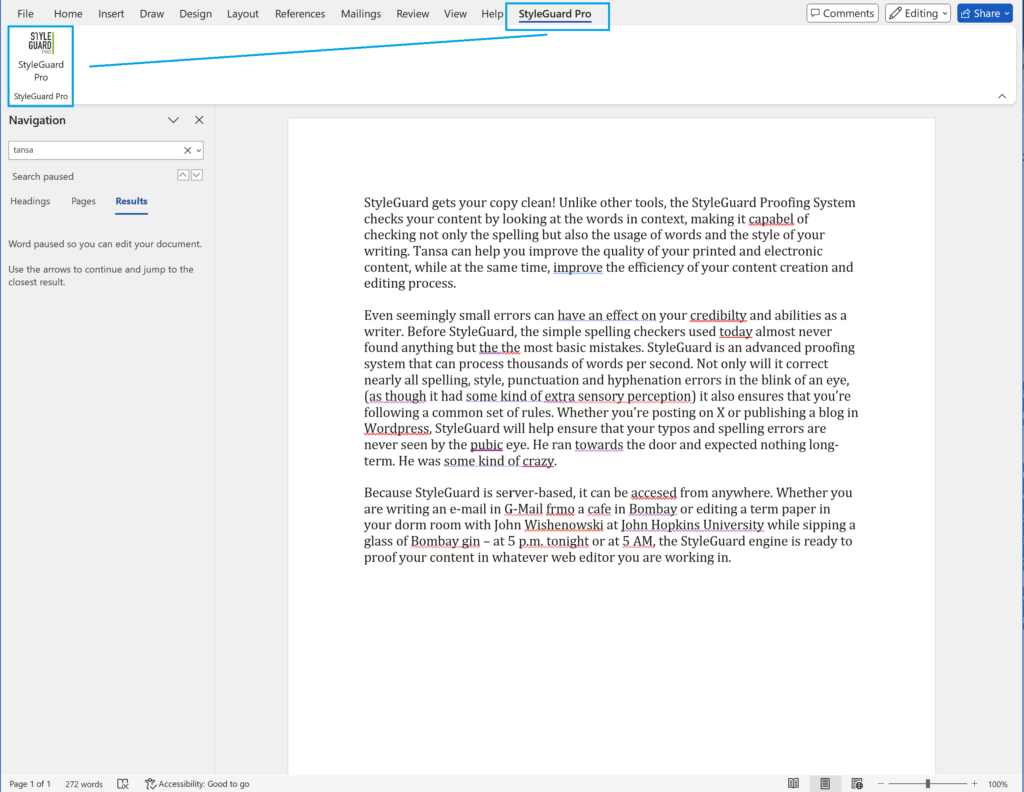
Once StyleGuard is installed, it will be visible in the Word Ribbon. Click on the StyleGuard Pro Menu and then click on the StyleGuard icon, to open the StyleGuard panel in your Word document.
The proofing menu
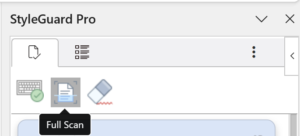
The Proofing menu has three primary buttons. Once you have some text in your document, if you have Auto Scan enabled (the keyboard icon), StyleGuard will immediately start analyzing your text. If you have a document open, but don’t have this feature enabled, you can click on the full scan button. This will initiate the proofing session. The third button, which looks like an eraser, will clear out the current findings (the cards in the panel and the colored lines in your text).
Proofing results
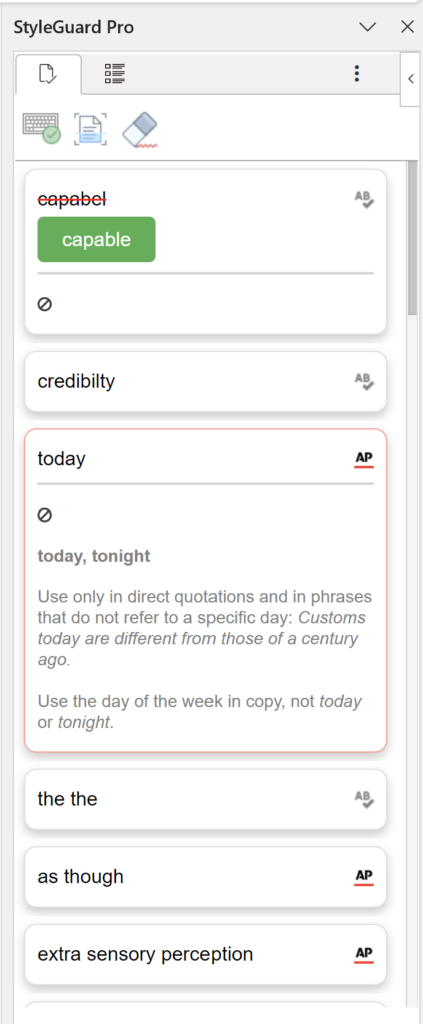
StyleGuard identifies and presents potential errors and corrections two ways. Once the scan is complete, or if you have Auto Scan enabled, you will see colored lines appear in your document. The system also generates proofing results as cards in the panel on the right-hand-side of your Word document.
Clicking a card makes it expand, revealing additional information about the spelling or style error.
In the upper corner, an icon will identify if this is a  spelling error or a style error, which could be based on your
 ![]() Personal Style Guide or the professional reference you are using, like the
Personal Style Guide or the professional reference you are using, like the ![]() Associated Press Stylebook or the
Associated Press Stylebook or the ![]() Canadian Press stylebooks.
Canadian Press stylebooks.
A correction will appear as a green button . By clicking on the button, you are accepting the suggested correction. Once clicked, the correction will be applied to your text and the card will be removed.
If you click the ![]() Ignore button, StyleGuard will disregard the issue and remove it from the list.
Ignore button, StyleGuard will disregard the issue and remove it from the list.
Reference information for style rules, whether they be from a published source, like the Associated Press, or your own custom rules, will be visible in the expanded list.
You can also edit or modify corrections directly in the Word document.
Search reference and local style entries
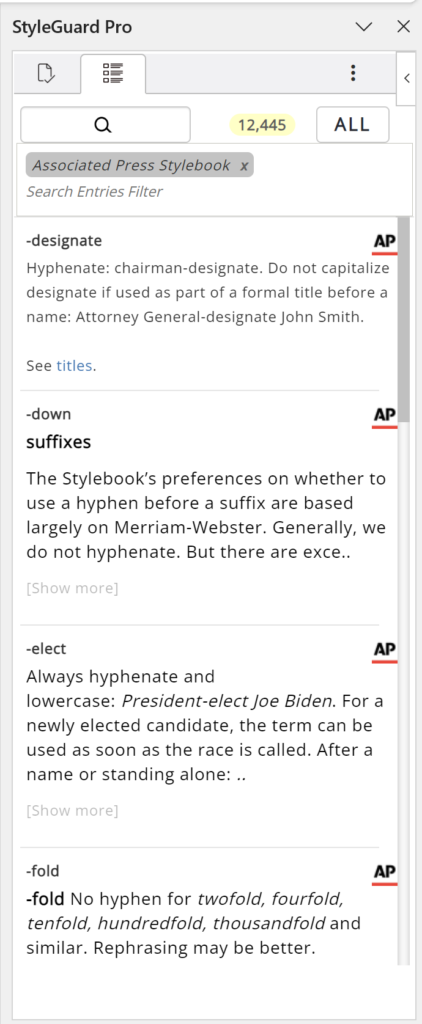
You can review and search your local style rules, along with published references by clicking on the index tab, located to the right of your proofing tab. Once engaged, you will be presented with a search window and filtering options to peruse the dictionaries or style guides you have access to.
StyleGuard options
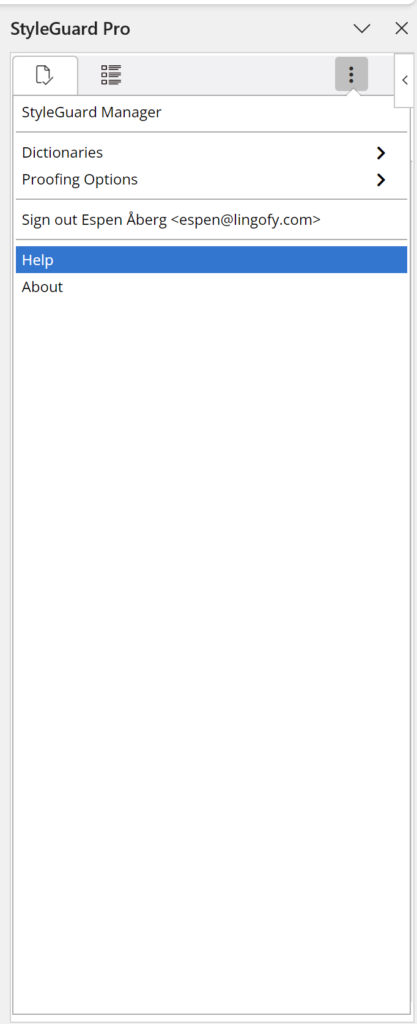
Clicking on the three dots, will open your StyleGuard settings. This will provide you with quick access to the StyleGuard Manager. The StyleGuard Manager is a separate web application, where you can create custom rules as well as review statistical data about your proofing usage.
You can select the references you wish to proof your content against as well as other options. You can also sign out and log into the software.
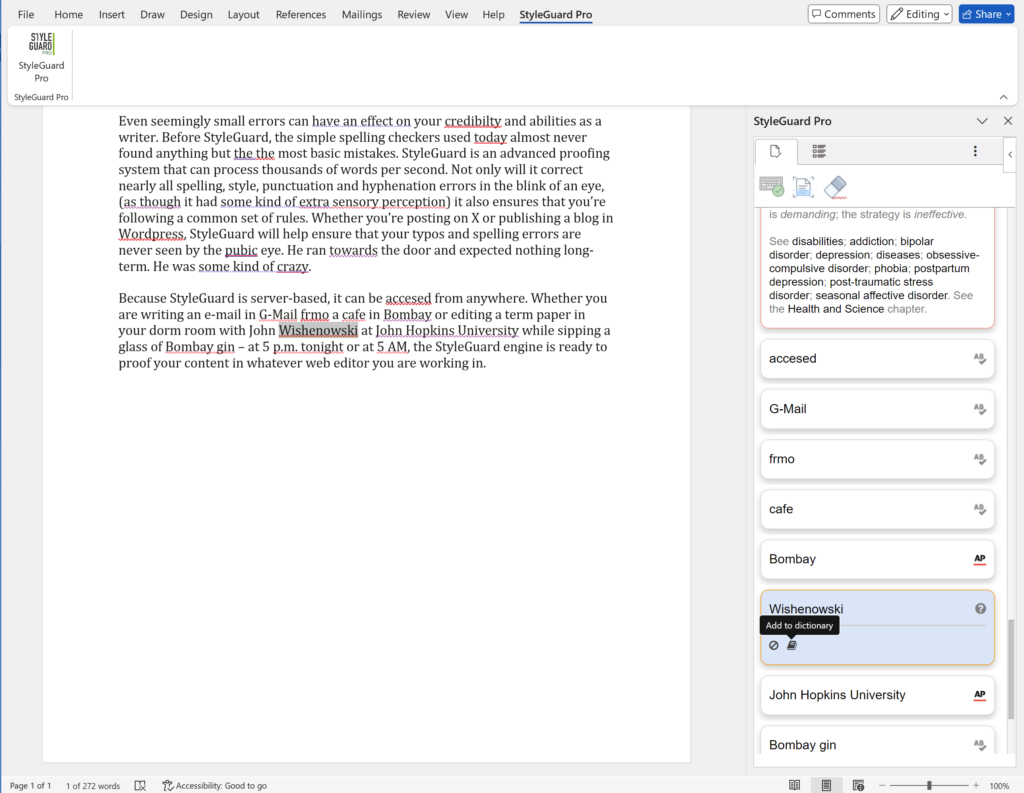
Add to dictionary
When StyleGuard encounters a word or name that it does not have enough information to provide suitable guidance for, it will identify the potential error as an ![]() Unknown. This card will appear in the StyleGuard panel with a yellow outline. If you are confident in the spelling of this word or name, you can add the item to your custom dictionary, by clicking the
Unknown. This card will appear in the StyleGuard panel with a yellow outline. If you are confident in the spelling of this word or name, you can add the item to your custom dictionary, by clicking the ![]() dictionary icon at the bottom of the expanded window.
dictionary icon at the bottom of the expanded window.
The Unknown word will automatically be put in the Term field, while the other two fields are optional. If there is a known incorrect form that you always want to make sure StyleGuard looks for, you can add that in the Search for incorrect form field. If you want StyleGuard to provide you with some specific information whenever it corrects this word, you can provide that in the Definition field. Then click Add and StyleGuard will immediately start enforcing this new rule for you.
Proofing Menu
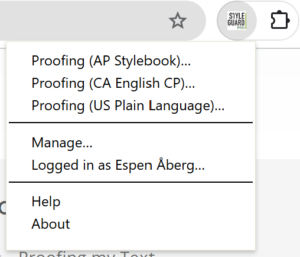
After you have installed the StyleGuard extension in your browser or program, logged in and clicked a proofing profile in the proofing menu, StyleGuard will check your text against the references and/or custom entries included in that proofing profile. Note: The StyleGuard proofing window provides one-stop editing for all your style needs– custom entries and published references such as AP get checked at the same time –and we recommend you hold off on proofing until your first draft is complete so you can find and fix all the issues at once.
Reviewing Results in the Proofing Window
As you review StyleGuard’s catches in the pop-up proofing window, there are some things we’d like to point out to make your proofing experience better:
Phrases, Not Just Words
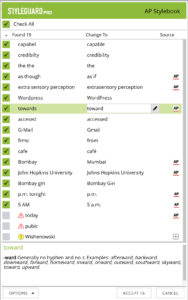
StyleGuard doesn’t just catch spelling errors, it catches style conflicts and multi-word phrases. It can also tell when you’ve spelled a word correctly but used it in the wrong place such as the example here where “John Hopkins University” is the “Found” term and StyleGuard suggests a “Change To” of “Johns Hopkins University” with an “s” on John.
Found
The “Found” column on the left of your window displays the term that StyleGuard thinks you should change. These are the incorrect terms. For example, the word “residental” is incorrect and should be changed to “residential” as shown in the next column…
Change To
The “Change To” column is filled with StyleGuard’s suggested correct replacements for the incorrect “Found” terms. Notice that the AP Stylebook has flagged “longterm” and suggested “long-term” as the fix.
Note: You can edit “Change To” suggestions if you don’t like them. Just click on the Change To term and type in your preference. At left, notice that the AP suggestion for “long-term” becomes editable by clicking on the term in the Change To column.
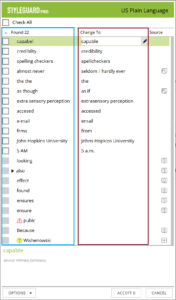
Source
The far-right column of your proofing window displays which entry source caught the issue. It might be:
- A reference (“AP Stylebook,” “US Plain Language,” “Financial Times”)
- A custom guide containing local entries (that you or another user created)
Hovering over the area to the far right of the term will provide a pop-up window with details about the source, as shown at right with the term “messaging,” which is a Warning term from “The Pink Lime Co.” custom guide. (More on Warnings below.)
This is also where adding icons to your custom guides improves your proofing experience: You can immediately tell the source of a term.
Tip: This example has the “Show Information Pane” option checked, which provides source and definition information at the bottom of your list in a separate window pane.

Accepting and Rejecting StyleGuard Suggestions
Check All: Each term listed has a checkbox to its left. (You can set those boxes to be checked or unchecked by default by going to the Options menu at the bottom left of the window.)
If you want to accept StyleGuard’s “Change To” term, check the box. (If you want to reject it: uncheck the box or leave it unchecked.)
There are a few different ways that “Found” terms are presented, based on what kind of proofing issue they present.
The majority of flagged terms will relate to either your reference (“AP and Webster’s,” “US English,” etc.) or custom entries created by you. StyleGuard will compare your text to those references and offer a replacement term in the right-hand “Change To” column.

There are two exceptions:
Exception 1: Warning: These entries — created by you or another StyleGuard user (and perhaps included in custom guides) or from certain references such as the AP Stylebook — appear with a small red triangle and exclamation point. These are words that should be avoided because they are vulgar, clichéd or prone to misuse. They can also be words that are only appropriate in certain contexts; “pubic” is relevant to medical copy, but usually doesn’t belong in advertising language. StyleGuard will not suggest a “Change To” for a Warning, but instead is warning the editor to ensure this term is being used in the right context.
In this example at right, a custom entry created by the user warns against using the advertising buzzword “messaging” in content intended for the public.
Tip: Warnings don’t have populated “Change To” suggestions because they aren’t forbidden, they just aren’t preferred. You can type a different word in the “Change To” field or reject the suggestion based on the context. Warnings are unchecked by default.
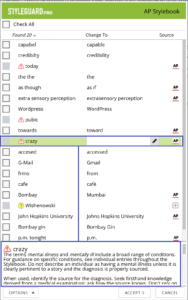
Exception 2: Unknowns: This is a word that none of StyleGuard’s sources recognize. In other words, this word isn’t in a reference such as AP or a custom entry created by the user or the underlying dictionary (Webster’s in this case). It appears with a question mark on a yellow circle.
Like a Warning, the “Change To” field is blank and you can double-click it to enter a change. Note that the checkbox is unchecked by default on Unknowns — you can choose to ignore this, if for example, it’s a term that is correct but won’t come up again in future copy (i.e., the last name of an interview subject). There is something else you can do when you come across an Unknown and that is….
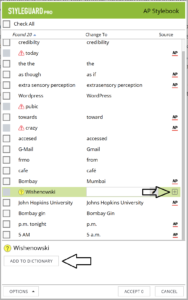
Add to Dictionary: This tool was created for users who share guides (and their custom entries) with others. The owner of the guide can add entries at any time, but this feature lets other users suggest new entries to the owner for review.
To the far right of the Unknown in the Source column is a plus symbol in a square. Clicking on that symbol generates a pop-up window that includes:
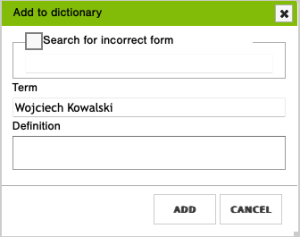
Search for incorrect form: You can add an incorrect version that StyleGuard will look for, but it’s not required.
Term: This will be populated with StyleGuard’s “Found term,” but you can alter it as needed.
Definition: Users can include style or definition information about the term in this field.
Click “Add” and the term will be sent to the guides owner’s Entries list as a “Suggestion.” The person in charge of those entries – the original guide creator and owner – can then decide whether to add this term to the custom guide or ignore it.
Tip: You can customize how the StyleGuard proofing window displays information with the “Options” button.
The proofing menu
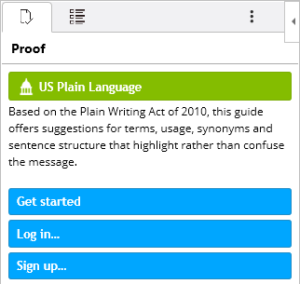
The Proofing menu has one or more green buttons, depending on which StyleGuard products you have access to. A green button represents a StyleGuard proofing service with a specific set of dictionaries, reference works, style guides and rules. Click a green button to make StyleGuard scan your text and bring you the results in a few seconds.
Proofing results
The proofing list contains:
- Change suggestions based on the Primary Dictionary, which in this case is US English. These are typically misspellings.
 Change suggestions based on the active style guide, which in this case is US Plain Language. These are not misspellings, but rather a guide to make your text more plain and simple to read and understand.
 Potential usage issues with often mixed words like affect/effect and who/whom.
 Synonyms that might improve your text. Click any of the suggested synonyms to make it a correction.
 Warnings: These can be profanities, clichés, imprecise words, loaded words, etc.
 Unknowns: Often names of people or places not yet in any of the dictionaries or guides. You have the option of clicking
  Add to dictionary. Unknowns can also be words with too many misspellings to find a match.
Each item has an ![]() Accept button and an
Accept button and an ![]() Ignore button. If the item displays the current word in the text as
Ignore button. If the item displays the current word in the text as ![]() , then clicking the Accept button will immediately correct this word in your text. Otherwise, clicking Accept will simply leave this word as it is in your text. The latter is true for Usage, Synonyms, Warnings and Unknowns, as long as you have not provided a correction for any of those. Clicking the Ignore button will always leave this word as it is in your text. Clicking either Accept or Ignore will remove this item from your list, moving you onto the next find.
, then clicking the Accept button will immediately correct this word in your text. Otherwise, clicking Accept will simply leave this word as it is in your text. The latter is true for Usage, Synonyms, Warnings and Unknowns, as long as you have not provided a correction for any of those. Clicking the Ignore button will always leave this word as it is in your text. Clicking either Accept or Ignore will remove this item from your list, moving you onto the next find.
The ![]() button at the top has a number indicating how many change suggestions StyleGuard has. In this case 18. This means that 18 of the list items has an actual correction, but there may be additional items as described above. Click this button to immediately go through with all the changes in your text.
button at the top has a number indicating how many change suggestions StyleGuard has. In this case 18. This means that 18 of the list items has an actual correction, but there may be additional items as described above. Click this button to immediately go through with all the changes in your text.
The ![]() button immediately cancels the remainder of the suggested changes. It does not roll back any changes already done by clicking on individual Accept buttons. Use the text editor’s Undo function for that.
button immediately cancels the remainder of the suggested changes. It does not roll back any changes already done by clicking on individual Accept buttons. Use the text editor’s Undo function for that.
If you want to provide your own correction to a find, simply hover your mouse over the word making it display an edit box, then click to start editing.

Add to dictionary
When StyleGuard lists an ![]() Unknown, you have the option of clicking
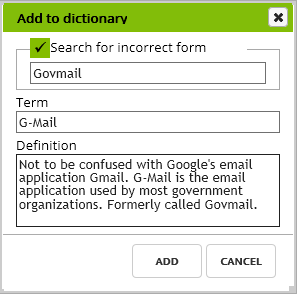
Unknown, you have the option of clicking ![]() Add to dictionary. This will bring up a dialog like the one shown here.
Add to dictionary. This will bring up a dialog like the one shown here.
The Unknown word will automatically be put in the Term field, while the other two fields are optional. If there is a known incorrect form that you always want to make sure StyleGuard looks for, you can add that in the Search for incorrect form field. If you want StyleGuard to provide you with some specific information whenever it corrects this word, you can provide that in the Definition field. Then click Add and StyleGuard will immediately start enforcing this new rule for you.
How Do I Add Custom Entries?
The StyleGuard Manager at StyleGuard.com provides a suite of tools to customize your proofing experience. You can add custom entries to catch local terms such as proper nouns, products, company names, neologisms or any other that can’t be found in a standard dictionary or reference. You can organize these entries in guides based on any metric you choose: topic, client, business or whatever works for you.
Entries
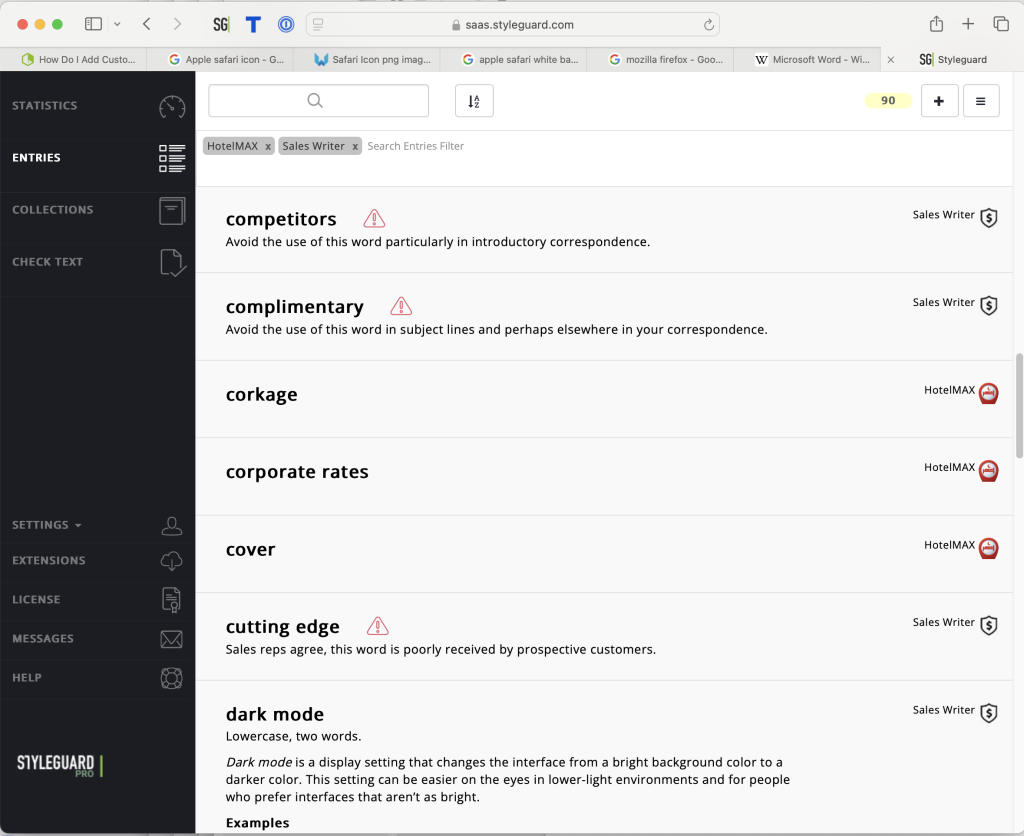
Every time you log into the StyleGuard Manager, you are taken to the Entries page where you can review, add or edit local terms that should be verified during proofing.
This is where the style-defining action happens — and you control it all. You can create, edit and assign your custom entries to various guides from here.
This view shows all your custom entries based on how you filter. The definition is displayed under the entry title in the list.
If a term is associated with a custom guide you’ve created (or one that has been shared with you), you’ll see its icon and name at the right.
Tip: If you don’t see an entry, click the Filter button and make sure you’ve included the right sources.
Add New Entry

To add a custom entry, click the “PLUS” button at the top right of the Entries page.
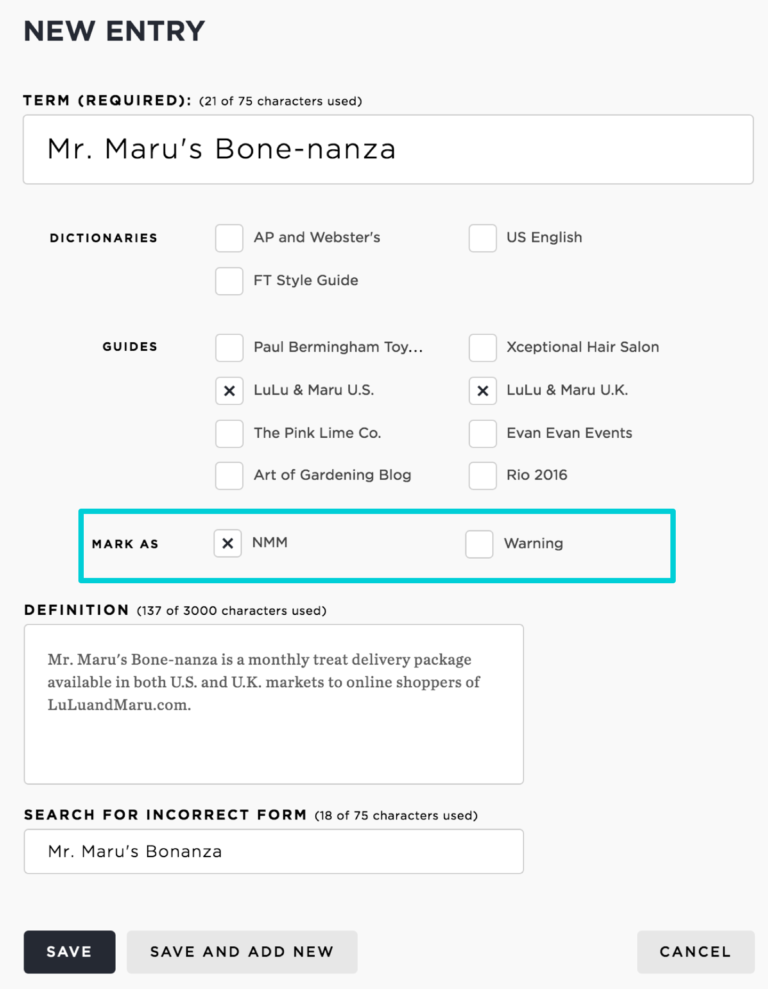
Add a new word or phrase for StyleGuard to check during proofing. The “New” button (top right of Entries page) takes you to the “New Entry” form where you can define your preferred spelling or style. You can write reference or usage notes that are visible when proofing, and decide which of your custom guides should include this entry.
As an example, we’re illustrating a workflow example for a boutique ad agency — The Pink Lime Co. — that manages ad and website copy for multiple customers. One of those customers is LuLu and Maru, a pet supply company that needs marketing and ad copy for online customers in the U.S. and the U.K. StyleGuard helps The Pink Lime staff correctly handle American and British English proofing.
New Entry
Term
This is it! This is how you define your style. Enter the correct form of the word or phrase you want here.
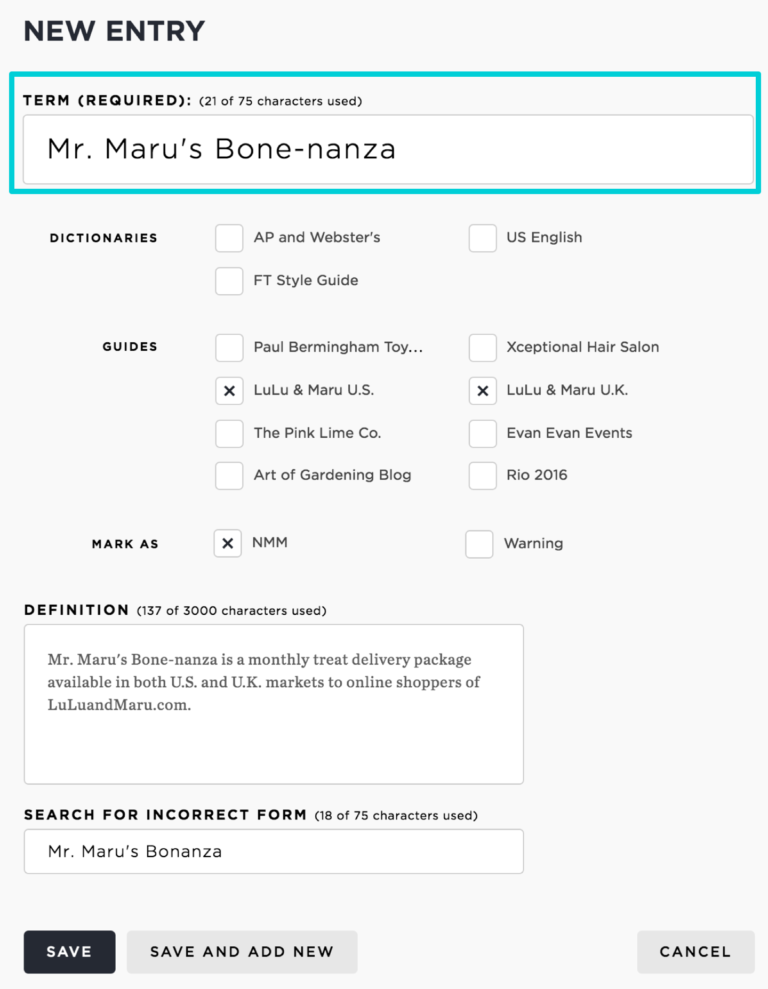
The term shown here is the name of a monthly treat delivery service offered by an online pet supply retailer. The desired spelling of “Mr. Maru’s Bone-nanza” will be accepted and checked for style by StyleGuard even though it can’t be found in any standard dictionary and would normally trigger a change in other spell-checking tools.
References (‘Dictionaries’)
If you have multiple references associated with your account, they will be listed with checkboxes so you can connect your new entry to each as desired. StyleGuard’s references include options such as “AP Stylebook” (AP StyleGuard purchase) and “US. English” (StyleGuard PLUS). If you purchase a reference subscription, you may see it listed here.
The Pink Lime Co. has multiple customers with various style needs. They use “AP Stylebook” for writing press releases. The “FT Style Guide” is a combination of a British English dictionary and Financial Times style. The Pink Lime uses this for their LuLu and Maru U.K. copy to ensure it matches British style and spelling needs. The “US English” option is American English without the AP Stylebook’s influence. “US English” also includes references and tips from the U.S. government’s Plain Language initiative, which encourages easy-to-understand writing.
Guides
Check the boxes to tell StyleGuard which of your custom guides should include this entry. Our example entry has been added to the U.S. and U.K. guides for the company LuLu and Maru. Think of guides as containers for your local, custom entries. You may work on different types of content that require different niche terms, and you can organize them into guides to make proofing more efficient. If you were editing or writing copy that had nothing to do Mr. Maru’s Bone-nanza or the pet supply company, you wouldn’t need to proof for those terms. With guides, you can separate out entries and apply them only to the copy that needs them, which is ideal for customers or content with conflicting style rules.
Note: Don’t see any guides? You have to build them!
Mark as
There are two options under this header:
- You can mark this as a Warning, which alerts proofers to avoid this term, but doesn’t force a change. An example of a Warning may be a cliché, curse word or common error such as “pubic” for “public.” Use this type of entry to bring attention to a term that should be carefully considered based on context. Note: Warnings should notinclude a “Search for Incorrect Form.” Use Warnings to highlight terms that are allowed if used in the right context. Editing medical copy and you wrote the word “pubic”? Well, that’s probably OK. Editing a story about “pubic” meetings at town hall? That’s an error, we hope. Warnings let you flag terms so a human can decide if it belongs based on context.
- You can also mark it for NMM, which stands for Near-Mismatch Algorithm. We’ll avoid getting too technical, but let’s say someone wrote “Mrs. Mary’s Bime-ansau” instead of “Mr. Maru’s Bone-nanza.” StyleGuard might not recognize that misspelling right away because it’s wrong by so many letters. Checking NMM is like a turbo boost, but it only works on terms of five letters or more. The NMM instructs StyleGuard to take more time to recognize badly misspelled words, which is why it’s not turned on for all terms.
In our example at right, NMM is turned on for this term because The Pink Lime Co. ad agency copywriters and editors struggled with it during rollout of this new product. It is kind of a tricky product name. NMM ensured various misspellings (and incorrect capitalization and punctuation) of this term were flagged and replaced with “Mr. Maru’s Bone-nanza.”
Definition
You can include a definition here, but you can also write any notes that you want seen in the StyleGuard proofing window. The text in this field will show up during the proofing process in the “Information Pane” or when a user hovers over the “Source” icon.
Our example explains that this term is a treat package available to customers in both the U.S. and the U.K. Product names especially can trip up standard proofing tools, but StyleGuard follows your style.
Search for Incorrect Form
The only required field is “Term,” but if you have noticed that your writers consistently put in a specific misspelling or incorrect form of the proper term, you can add it here and StyleGuard will search for that term and replace it with the correct version. If you find more than one common misspelling of a term, you can create a second (or third or fourth …) entry for the same correct term and include that typo in the “Search For” field.
Save
If you are done with your entry and don’t want to add any others, click this button to add your term to the appropriate guide and reference. It will immediately be available for proofing as long as the reference or guide it is in is already in your StyleGuard extension menu. If it’s not already there, add it by logging in and out of the button.
Save and Add New
If you are done with this entry, but have more to add, click this button and your current entry will immediately be available for proofing while your screen will load with a ready-to-use “New Entry” form.
Tip: If you’ve got a long list of entries to add, you may want to use the Import feature.
If you are adding an entry to a guide that doesn’t show in your StyleGuard extension, check out our info on custom guides and proofing profiles. You’ll see how to create and add guides full of entries into proofing profiles that will show in your StyleGuard extension drop-down menu.
How do I create custom guides
Custom Collections
Collections are really just virtual containers for custom entries that allow you to keep track of which terms apply to which copy. Collections or guides, as they are often referred, are another tool StyleGuard offers for customization based on content or workflow. You can use them to organize entries based on project, department, language, client, topic and more. We called them collections so you’d know they are virtual sets of proofing rules that may be targeted at a specific type of content, client or project. You can add collections to proofing profiles and then proof content from the StyleGuard extension. We’ll explore your customization and organization options here, but how you employ them is up to you.
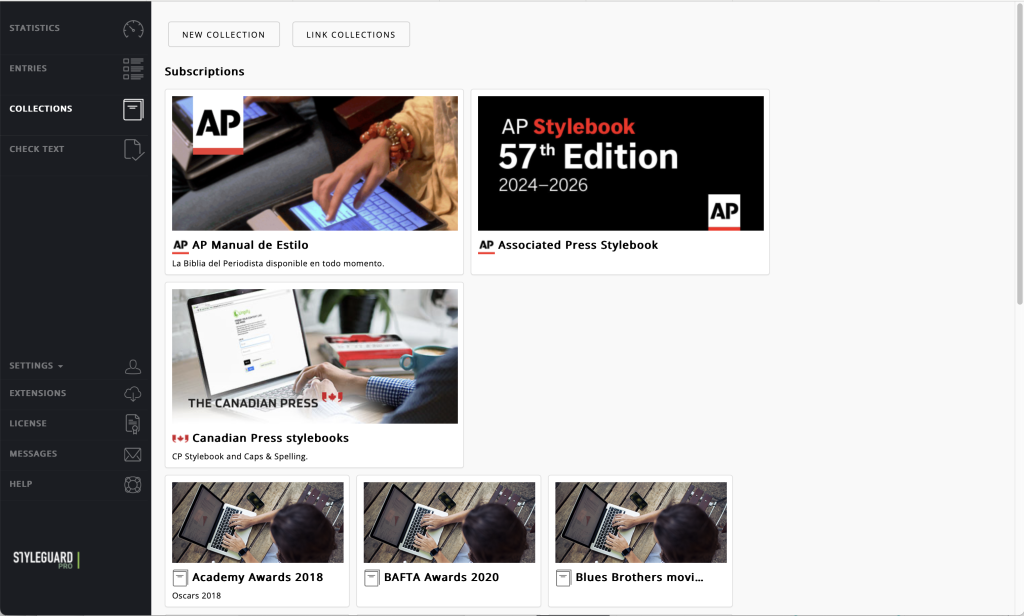
The image below shows the collections page in StyleGuard Manager. Note the buttons at top right for “New Style Guide” and “Link Guides,” which we explain below.
New Collection
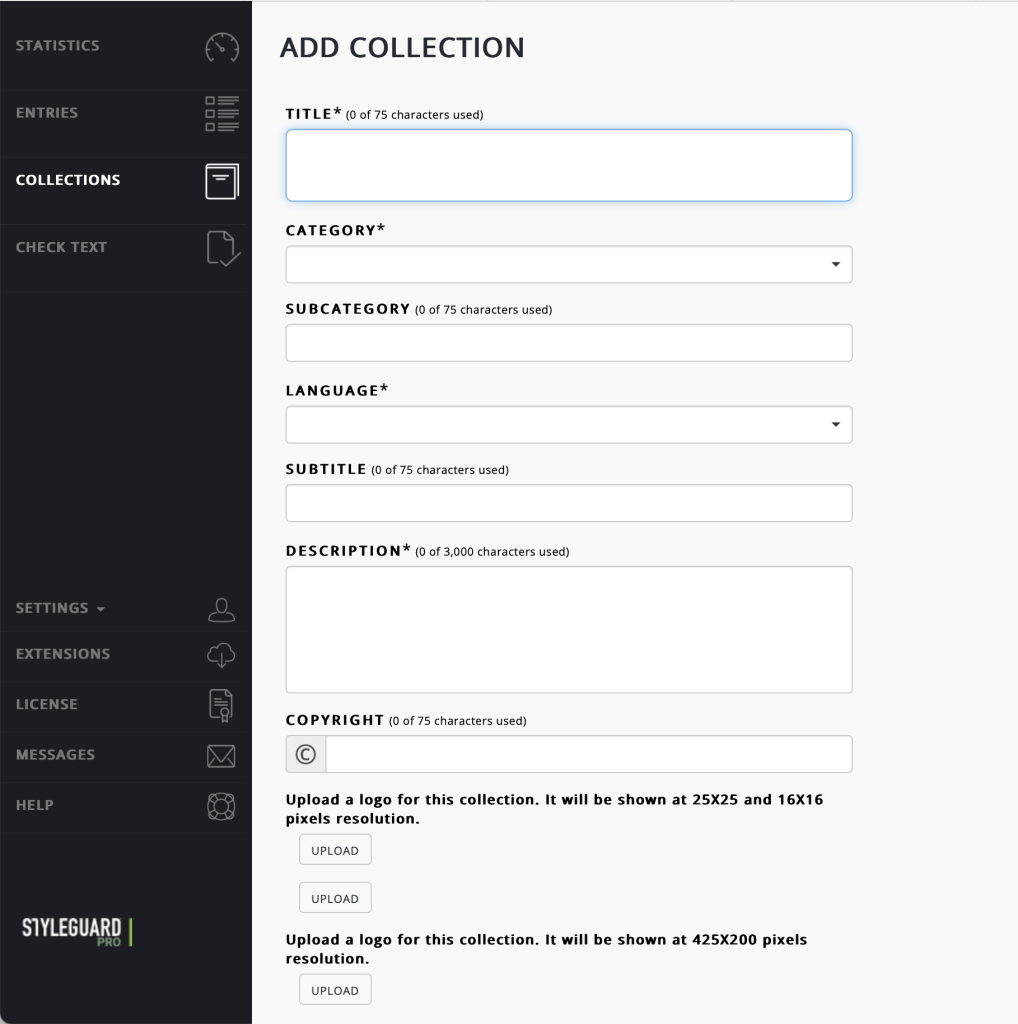
Create a new “container” for entries using the “New Style Guide” button. You can organize terms by housing them in guides to better manage different terms for different projects, regions or languages. If you share a guide, you can also set permissions about which users can view or edit entries.
Title
Name your entries “container” here. You might choose a name based on the type of content this guide is intended for (press releases, blog posts, newsletters). You may also create it based on the subject matter (sports, advertising, gardening, furniture, animals, politics). It’s up to you.
Category
StyleGuard provides a list of topics with which you can tag a guide.
Subcategory
You may want to get even more specific with your guide organization. You can enter any phrase in this field to help keep track of your entries.
Language
Your language options when creating a guide are dependent on your language selection under your Settings (in the StyleGuard Manager sidebar) and your references. If you have a British English reference (Financial Times), you can select British English. If you have an American English reference (US English), you can select American English. If you have both types, you’ll be able to choose one or the other.
Description
In this field, you can explain what kind of content this guide is aimed at and how it should be used by yourself or other shared users.
Upload/Remove icon
Each of your collections can have an icon that shows in the Source column of the proofing window and in the Entries list. To add an icon image, select the “Upload” button, which will launch a file window where you can navigate to the image you want to use. Hit Remove to get rid of the image or to replace it.
Tip: Be sure the entries you add to a guide match the language selected. You wouldn’t want to include an entry for “local color” in a British English guide because your custom entries always outrank your reference terms. You’d want to make that “local colour.”
My Guides
When you are on the Style Guides screen (top image), the center is populated with any collections created by you (“My Collections”) or shared with your account (“Subscription”). You’ll see a guide’s:
- Title
- Icon (if one isn’t added, you’ll see a default icon)
- Description
- Number of entries (Words)
- Number of users
This allows you to get a simple overview of a collection’s purpose and usage. If you want more specifics, click on the guide.

To manage a collection, click on it from the “My Collections” area and you’ll see a “Collection Details” pop-up appear (shown at right). Hovering your mouse over any of the icons in this window will provide the action name.
You can interact with a specific collection in several ways:
![]() Browse: Review, manage or edit its custom entries.
Browse: Review, manage or edit its custom entries.
![]() Edit: Change the collection’s details; the ones you added when you made the collection. You don’t edit the entries from here, just the collection details such as title, language, category and similar. Go to the “Browse” icon to see and edit entries, if permissions allow.
Edit: Change the collection’s details; the ones you added when you made the collection. You don’t edit the entries from here, just the collection details such as title, language, category and similar. Go to the “Browse” icon to see and edit entries, if permissions allow.
![]() Share: You can share a custom collection with up to five other people via email address. They will need to have or create a StyleGuard account to access it. You can set their permissions with “Edit Users.”
Share: You can share a custom collection with up to five other people via email address. They will need to have or create a StyleGuard account to access it. You can set their permissions with “Edit Users.”
![]() Edit Users: Here you can see a list of everybody who has access to this collection. You can also remove users, send a message to users or give/revoke user permissions (whether or not they can edit or add entries).
Edit Users: Here you can see a list of everybody who has access to this collection. You can also remove users, send a message to users or give/revoke user permissions (whether or not they can edit or add entries).
![]() Delete: You can get rid of a collection by clicking the trashcan icon. Once deleted, it is gone forever. You always have the option of removing additional users and ignoring it for a while until you are sure you want to toss it.
Delete: You can get rid of a collection by clicking the trashcan icon. Once deleted, it is gone forever. You always have the option of removing additional users and ignoring it for a while until you are sure you want to toss it.
![]() Import: You can import entries directly into a collection with this feature.
Import: You can import entries directly into a collection with this feature.
Subscriptions
This area of the Style Collections page displays any collections that have been shared with you by another StyleGuard user or through purchase.
From the Style Guides page, hit the “New Style Guide” button to bring up the “Add Guide” form.
Subscriptions
This area of the Style Collections page displays any collections that have been shared with you by another StyleGuard user or through purchase.
If it’s a purchased or StyleGuard-created collection, you can proof with it by adding it to a proofing profile, but you will not have permission to edit its terms.
If it’s a collection that was shared with you by another StyleGuard user, he sets your permissions to edit or add terms. You can proof with it by adding it to a proofing profile.
To the right of the “New Style Collection” button on the Style Collections screen is the “Link Collections” button.
Click this to go to a management screen that lets you connect or disconnect a collection from the reference (AP Stylebook, for example) to which it is currently linked.
This affects the underlying reference (style manual or dictionary):
US English: Plain Language, includes Usage, Synonym’s guidance (PLUS).
AP Stylebook: Updated daily!
FT Style: Financial Times style combined with Oxford UK English.
How do I import entries?
You can import multiple entries at once into StyleGuard. Perhaps you have a roster of softball players or a company contact list. Perhaps you have a scientific style collection that you want to use when proofing with StyleGuard.
The “Import” feature lets you specify to which out-of-the-box reference (AP Stylebook) or custom collection the entries you import should be added. Then you can use a text editor to create tab-delimited entries and paste them into the window.
Import
Go to the Entries page and click the “Manage” button. At the bottom of the screen is the “Import” button; click it and a pop-up will appear. First select the collection or reference to which you want to add the terms from the drop-down menu.
Create the import list in a simple text editing program (such as TextWrangler or Notepad). You can import just the correct entry terms or both terms and definitions.
Format the terms in your text editor using the Tab and Return keys like this (brackets indicate the action of hitting TAB or RETURN and should not be included in your text document):
- correct word[hit RETURN]
or
- incorrect word[hit TAB]correct word[hit RETURN]
or
- incorrect word[hit TAB]correct word[hit TAB]information[hit RETURN]
or
- [hit TAB]correct word[hit TAB]information[hit RETURN]
Then copy and paste your list into the StyleGuard import window.
Note: You cannot type these entries directly into the import window because browsers can’t understand a TAB the same way as a text editing program. You can build import lists in programs such as Notepad or TextWrangler or any simple text environment. Then copy and paste that list from the text document (.txt) into the box.
